Form Node
The Form Node is experimental. Its API and configuration may change in future releases.
The Form Node is a container node that renders an HTML form. It manages form structure (inputs, labels, fieldsets), handles submission, and optionally connects to server-side handlers for processing (for example, adding a subscriber to Google Contacts).
Modes
The Form Node has two modes:
| Mode | Description |
|---|---|
| Default | Raw mode — you configure an action URL and write a custom TypeScript submit handler |
| Handler | Delegates submission to a registered server-side handler (e.g. google_contact) |
Default Mode
In Default mode you control the entire form submission flow.
Configuration
The settings panel exposes two fields:
- Action URL — the endpoint the form POSTs data to (required)
- Redirect URL — optional URL to redirect to after a successful submission
Submit handler
Click Configure Submit Handler to open a Monaco code editor with a TypeScript scaffold. Write your submission logic between the // start and // end markers — everything outside those markers is read-only scaffolding injected by the editor.
The scaffolded function signature is:
function onSubmit(form: HTMLFormElement, event: SubmitEvent) {
  // your code here
}
Two variables are injected into scope automatically:
config— the currentFormConfig({ action: string; redirectUrl?: string })messageClassName— CSS class name of the form's status message element; use it to target the display element
The default scaffolded implementation calls fetch() with the form data, shows a success message (or redirects), and displays an error on failure. You can replace it entirely or extend it.
Click Update Submit Handler after editing code or changing the Action/Redirect URLs — this recompiles the TypeScript and regenerates the minified JavaScript that runs in the browser.
Handler Mode
In Handler mode, form submission is delegated to a server-side handler registered via the WP-Node hook system. You do not write a custom submit handler — the Form Node generates a minimal event dispatcher that triggers the registered hook.
Handlers are registered under the WP-Node filter hook next_editor_form_handler_name. A handler receives the form data, processes it (e.g. creates a contact), and calls back into the UI to display a result message.
Available handlers
| Handler name | Description |
|---|---|
google_contact | Adds the submitted email to a Google Contacts group with reCAPTCHA v3 spam protection |
Google Contact Handler
The google_contact handler adds form subscribers to a Google Contacts group. On each submission it:
- Verifies the reCAPTCHA v3 token server-side (rejects likely-bot traffic with score < 0.5)
- Creates a Google Contact via the People API (email + optional name)
- Adds the contact to a configured contact group
Required environment variables
Add these to .env.local:
# OAuth 2.0 credentials (from Google Cloud Console)
GOOGLE_CLIENT_ID=...
GOOGLE_CLIENT_SECRET=...
GOOGLE_REDIRECT_URI=http://localhost:3000/api/auth/callback/google
GOOGLE_REFRESH_TOKEN=...

# Contact group to add subscribers to (see below for how to find this)
GOOGLE_CONTACT_GROUP_RESOURCE_NAME=contactGroups/abc123

# reCAPTCHA v3 keys (register at google.com/recaptcha)
GOOGLE_RECAPTCHA_SITEKEY=...
GOOGLE_RECAPTCHA_SECRET=...
Google Cloud Console setup
- Go to console.cloud.google.com
- Enable People API under APIs & Services → Enabled APIs
- Create an OAuth 2.0 Client ID (Web application type)
- Add your authorized redirect URIs — include
http://localhost:3000/api/auth/callback/googlefor local development - Configure the OAuth consent screen and add your Gmail address as a test user
Getting GOOGLE_REFRESH_TOKEN
Add http://localhost:9999/callback to your OAuth client's authorized redirect URIs in Cloud Console, then run the script below once:
export $(grep ^GOOGLE_CLIENT_ID .env.local) && \
  export $(grep ^GOOGLE_CLIENT_SECRET .env.local) && \
  node get-refresh-token.mjs
// get-refresh-token.mjs
import { createServer } from "http";
import { exec } from "child_process";

const CLIENT_ID = process.env.GOOGLE_CLIENT_ID;
const CLIENT_SECRET = process.env.GOOGLE_CLIENT_SECRET;
const REDIRECT_URI = "http://localhost:9999/callback";
const SCOPES = [
  "https://www.googleapis.com/auth/contacts",
].join(" ");

const authUrl =
  `https://accounts.google.com/o/oauth2/v2/auth` +
  `?client_id=${CLIENT_ID}` +
  `&redirect_uri=${encodeURIComponent(REDIRECT_URI)}` +
  `&response_type=code` +
  `&scope=${encodeURIComponent(SCOPES)}` +
  `&access_type=offline&prompt=consent`;

const server = createServer(async (req, res) => {
  const url = new URL(req.url, "http://localhost:9999");
  const code = url.searchParams.get("code");
  if (!code) { res.end("no code"); return; }

  const body = new URLSearchParams({
    code, client_id: CLIENT_ID, client_secret: CLIENT_SECRET,
    redirect_uri: REDIRECT_URI, grant_type: "authorization_code",
  });

  const r = await fetch("https://oauth2.googleapis.com/token", {
    method: "POST",
    headers: { "Content-Type": "application/x-www-form-urlencoded" },
    body,
  });
  const data = await r.json();
  console.log("\nGOOGLE_REFRESH_TOKEN=" + data.refresh_token);
  res.end("Done! Check your terminal.");
  server.close();
});

server.listen(9999, () => {
  console.log("Opening browser...");
  exec(`open "${authUrl}"`);
});
Paste the printed GOOGLE_REFRESH_TOKEN=... value into .env.local.
Getting GOOGLE_CONTACT_GROUP_RESOURCE_NAME
First get a temporary access token using your refresh token:
# get-access-token.sh
export $(grep ^GOOGLE_CLIENT_ID .env.local)
export $(grep ^GOOGLE_CLIENT_SECRET .env.local)
export $(grep ^GOOGLE_REFRESH_TOKEN .env.local)

curl -s -X POST https://oauth2.googleapis.com/token \
  -d "client_id=$GOOGLE_CLIENT_ID" \
  -d "client_secret=$GOOGLE_CLIENT_SECRET" \
  -d "refresh_token=$GOOGLE_REFRESH_TOKEN" \
  -d "grant_type=refresh_token" \
  | python3 -c "import sys,json; print(json.load(sys.stdin)['access_token'])"
Then list your contact groups:
# get-contact-groups.sh
ACCESS_TOKEN=$(bash get-access-token.sh)

curl -s -H "Authorization: Bearer $ACCESS_TOKEN" \
  "https://people.googleapis.com/v1/contactGroups" \
  | python3 -c "
import sys, json
for g in json.load(sys.stdin)['contactGroups']:
    print(g['resourceName'], '\t', g['name'])
"
Copy the resourceName (e.g. contactGroups/abc123) for the group you want to use. To create a new group, go to contacts.google.com → left sidebar → Create label, then re-run the script.
If GOOGLE_CONTACT_GROUP_RESOURCE_NAME is omitted, submissions are added to contactGroups/myContacts (the built-in "My Contacts" group).
reCAPTCHA v3 setup
- Go to google.com/recaptcha/admin
- Create a new site — select reCAPTCHA v3
- Add your domain (e.g.
localhostfor local development) - Copy the Site Key →
GOOGLE_RECAPTCHA_SITEKEY - Copy the Secret Key →
GOOGLE_RECAPTCHA_SECRET
The handler automatically injects the reCAPTCHA v3 script on form load and executes a challenge on submit. Submissions with a bot-likelihood score below 0.5 are rejected server-side.
Settings panel
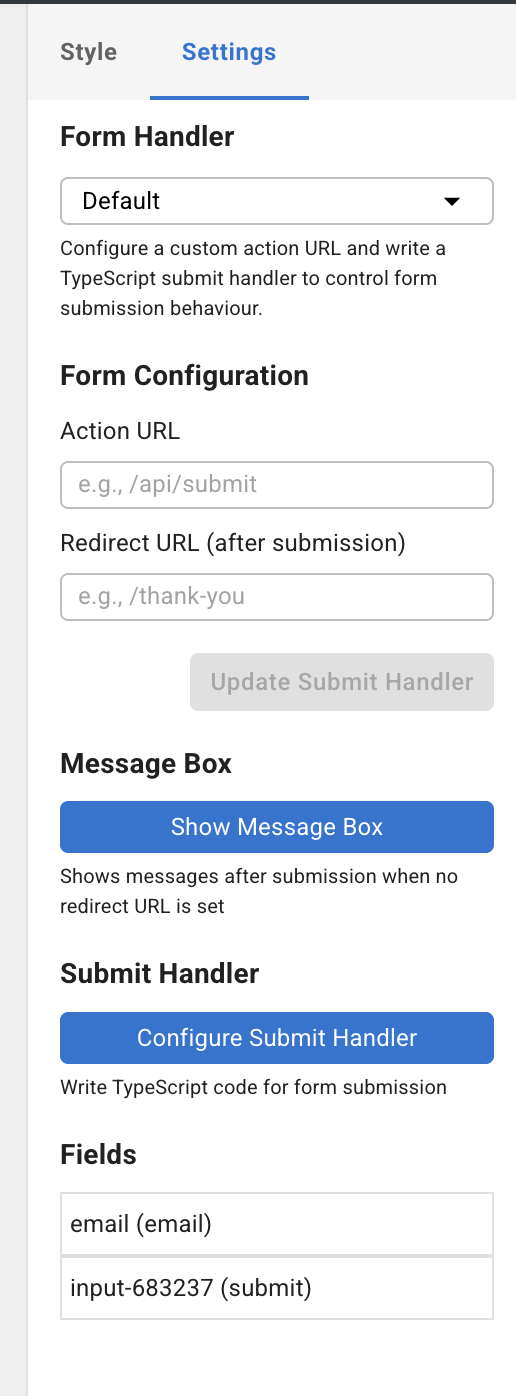
The settings panel shows:
- Form Handler — dropdown to switch between
defaultand registered handlers (e.g.google_contact) - Form Configuration (Default mode only) — Action URL and optional Redirect URL fields, plus an Update Submit Handler button
- Message Box — toggle to show or hide the form's submission status message element
- Configure Submit Handler (Default mode only) — opens the Monaco TypeScript editor in a draggable modal
- Fields — lists all input fields (name + type); click any field to edit its properties